


Let’s take a look a fediverse relays, and in particular, FediBuzz. We’ll go over the basics of how relays work, and then dive into a fresh install on Ubuntu.
Objective
My objective for this project is to understand how relay works, and complete an install of the FediBuzz relay from my home lab.
What is a relay?
For small instances on the fediverse, it can be lonely. Unlike siloed social feeds such as Twitter or Facebook, you are only going to see content from people you follow and people they interact with. If your instance is large, or even a small enthusiastic group of followers around a common subject, a relay may not be necessary. But for very small or single user instances, you can miss out on a lot of good content.
A relay is an application that listens to the public feeds of many fediverse instances, pulls them together, and provides a way for smaller instances to subscribe to a portion of incoming content that would have been missing otherwise. This featureset is built into many platforms and is accessible by the adminstrators of the instance.
How does it work?
The relay service reaches out to many instances and pulls in their public feeds. Mastodon now has public feeds secured by access tokens, so relays must collect a token for each server it connects to. Once access has been secured, the relay starts pulling in the streaming public feeds of the instance.
I can only speak to FediBuzz, but an interesting aspect here is that none of the content is stored locally other than the follow relationships. The posts themselves appear in the live feed stream and then disappear just as quickly. FediBuzz listens to the streams and determines if any of it’s relay followers are interested in the posts - if so, they are delivered to the appropriate relay inboxes.
What’s FediBuzz?
FediBuzz is one such relay, one of the more popular ones.
Platforms that I am aware of that support using administrator managed relays are:
Documentation is fairly spotty for this feature. It’s simple to configure, however, once you find it.
If your platform of choice isn’t listed, there are still ways to connect to a relay without being an administrator.
Relay Types
FediBuzz has 3 types of relays: Hashtag, Instance and Language.
Hashtag Relay
With this relay, you can subscribe to a specific hashtag and only content related to that hashtag will be added to your server.
1

https://relay.fedi.buzz/tag/knitting 🧶
Instance Relay
You can also follow an entire instance. But it’s not quite what you would expect. You are only going to get the posts for that instance as found on the relays you’re attached to.
1

https://relay.fedi.buzz/instance/fluffy.family 🐶
For example, if my relay is attached to the public feed of dotnet.social and hachyderm.io and I ask to get all posts from mastodon.social, it’s only going to send over posts from mastodon.social users that have made it to dotnet.social or hachyderm.io.
Language Relay
The same goes for the last type of content - language. You can also relay all content from a specific language, and ignore the rest!
For languages, you have to know the abbreviations for this to work. “es” is for Spanish.
1

https://relay.fedi.buzz/language/es 🇲🇽
Here’s a list of all known language abbreviations available on a Mastodon instance.
All Language Abbreviations
| Language | Value |
|---|---|
| Afrikaans | af |
| aragonés | an |
| اللغة العربية | ar |
| Asturianu | ast |
| беларуская мова | be |
| български език | bg |
| বাংলা | bn |
| brezhoneg | br |
| bosanski jezik | bs |
| Català | ca |
| سۆرانی | ckb |
| corsu | co |
| čeština | cs |
| Cymraeg | cy |
| dansk | da |
| Deutsch | de |
| Ελληνικά | el |
| English | en |
| English (British) | en-GB |
| Esperanto | eo |
| Español | es |
| Español (Argentina) | es-AR |
| Español (México) | es-MX |
| eesti | et |
| euskara | eu |
| فارسی | fa |
| suomi | fi |
| føroyskt | fo |
| Français | fr |
| Français (Canadien) | fr-QC |
| Frysk | fy |
| Gaeilge | ga |
| Gàidhlig | gd |
| galego | gl |
| עברית | he |
| हिन्दी | hi |
| Hrvatski | hr |
| magyar | hu |
| Հայերեն | hy |
| Bahasa Indonesia | id |
| Asụsụ Igbo | ig |
| Ido | io |
| Íslenska | is |
| Italiano | it |
| 日本語 | ja |
| ქართული | ka |
| Taqbaylit | kab |
| қазақ тілі | kk |
| ಕನ್ನಡ | kn |
| 한국어 | ko |
| Kurmancî | ku |
| Kernewek | kw |
| latine | la |
| lietuvių kalba | lt |
| latviešu valoda | lv |
| македонски јазик | mk |
| മലയാളം | ml |
| मराठी | mr |
| Bahasa Melayu | ms |
| ဗမာစာ | my |
| Nederlands | nl |
| Norsk Nynorsk | nn |
| Norsk | no |
| occitan | oc |
| ਪੰਜਾਬੀ | pa |
| Polski | pl |
| Português (Brasil) | pt-BR |
| Português (Portugal) | pt-PT |
| Română | ro |
| Русский | ru |
| संस्कृतम् | sa |
| sardu | sc |
| Scots | sco |
| සිංහල | si |
| slovenčina | sk |
| slovenščina | sl |
| Shqip | sq |
| српски језик | sr |
| Srpski (latinica) | sr-Latn |
| Svenska | sv |
| ślůnsko godka | szl |
| தமிழ் | ta |
| తెలుగు | te |
| ไทย | th |
| Türkçe | tr |
| татар теле | tt |
| ئۇيغۇرچە | ug |
| Українська | uk |
| اردو | ur |
| Tiếng Việt | vi |
| ⵜⴰⵎⴰⵣⵉⵖⵜ | zgh |
| 简体中文 | zh-CN |
| 繁體中文(香港) | zh-HK |
| 繁體中文(臺灣) | zh-TW |
Why not just use FediBuzz instead of installing it yourself?
Great question. You should!
FediBuzz likely already has access to that same instance and much more.
The OG fedibuzz relay doesn’t provide a list of instances for which they are connected. But as of April 2024, I was provided that 329 unique domains are included. It’s more than enough to provide a solid set of data for your small instance.
I did add a single additional instance, just to make sure it worked. It did. I can see this useful if you want to build out a relay for a specific topic, or you want to include a collection of smaller instances that are related to that community.
Skip the install
Aren’t interested in learning how to install a relay? Just skip to my summary.
Homelab Configuration
My homelab consists of the following:
- Router Configured to forward 80, 443 through a firewall to NGINX Proxy Manager
- NGINX Proxy Manager then directs traffic based on the incoming domain name to the appropriate spot.
- A ProxMox server with an Ubuntu VM hosting the FediRelay application.
Hardware
I used a ProxMox VM running in my homelab, configured with all the normal things - SSH access via keys only, snapshots, backups, etc.
This could be run very cheaply on any hosting site like Hetzner. I’m curious if this could even be run as a Cloudflare worker in some way (rewritten of course).
- Ubuntu 22.04.4 LTS ISO Image
- 1 Core
- 1 GB RAM
The official fedi.buzz relay traffics around 330 public instance streams for around 3,500 unique followers (some may have multiple relay requests) as of April 2024.
If you’re connecting to the fedi.buzz relay and perhaps one or two others on your own relay, this should be more than enough.
It doesn’t take much to run this. Why? Because once compiled, this is doing just a few queued up tasks. One is receiving incoming streams of data from fediverse servers. Then, checking to see if that content is wanted by anyone using the relay. If it is, it’s queued up for delivery.
At no point are the posts physically stored in a database, they are held in memory for distribution out to other servers.
The only item stored locally are the server names (actors) and their interested tags, instances and languages so the content can be distributed out appropriately.
FediBuzz has a mostly unknown option that allows individual users to utilize relays as well. If you promote this alternative route and many individuals start connecting to your relay, it will absolutely cause more outgoing traffic for you as you deliver the same messages to multiple inboxes rather than just to the server’s relay itself.
Domain Name
As with most fediverse projects, you’re going to need a domain. In this particular instance, I used a subdomain of https://relay.{yourdomain}.
NGINX Proxy Manager Config
I needed a wildcard SSL for my domain, and used the PorkBun API to make that work. Here’s a blog post about Cloudflare, but the setup is very similar for PorkBun.
My relay is using wildcard SSL cert pointing to my ProxMox VM. I’m not sure websockets are needed but I enabled it in NGINX Proxy Manager during configuration.
Firewall
I wish I could say I knew all this up front, but this took me quite awhile to get right.
The following ports need to be open on the server running FediRelay. I’m using ufw here.
1
2
3
4
5
6
7

## Default is 3000 in the FediBuzz docs, but that port was already taken
sudo ufw allow 3020
## Default is 6378 for Redis Cache, but my install was on 6379
## Uou can probably skip this as redis isn't required.
sudo ufw allow 6379
## Allow SSH traffic so you can connect - consider limiting to specific IPs
sudo ufw allow 22
Server configuration
Now you have your environment. It’s time to set it up!
Initial server installs
These packages are required for rust / cargo to work.
1
2
3
4
5
6

sudo apt-get update
sudo apt install pkg-config
sudo apt-get install libssl-dev
sudo apt-get install libsystemd-dev
sudo apt install git cargo
sudo apt install curl
curl was already installed for me.
Rust and related tooling install
Rust is already installed on Ubuntu, but not compatible with rustup. Remove it.
1
2

sudo apt remove rustc cargo
sudo apt autoremove
1

curl --proto '=https' --tlsv1.2 -sSf https://sh.rustup.rs | sh
Just installed the default (1) option. This could take a LONG while.
Then set your system’s PATH environment variable to make Rust’s tools globally accessible:
1

source $HOME/.cargo/env
Pull GitHub Repo
1

git clone https://github.com/astro/buzzrelay.git
Excluded Features
If you audit the official FediBuzz Relay site, you’ll notice that there are a few additional pages beyond the relay home page.
https://fedi.buzz shows trending hashtags across the known instances. This page is NOT included in the relay github repository.
https://fedi.buzz/token/donate is not part of the relay repository either.
Postgres SQL configuration
Install a PostGresSQL database, I followed this guide and it worked fine.
1

createuser --interactive
- Role (user) to add: relay as superuser
Password wasn’t set, so from a postgres prompt:
ALTER USER relay WITH PASSWORD 'your-secure-password';
Then create database:
CREATE DATABASE buzzrelay;
Then grant the relay user with full rights to the database:
1

ALTER DATABASE buzzrelay OWNER TO relay;
1
2
3
4
5
6
7
8

GRANT ALL PRIVILEGES ON DATABASE buzzrelay TO relay;
GRANT ALL PRIVILEGES ON ALL TABLES IN SCHEMA public TO relay;
GRANT ALL PRIVILEGES ON ALL SEQUENCES IN SCHEMA public TO relay;
GRANT ALL PRIVILEGES ON ALL FUNCTIONS IN SCHEMA public TO relay;
ALTER DEFAULT PRIVILEGES IN SCHEMA public GRANT ALL PRIVILEGES ON TABLES TO relay;
ALTER DEFAULT PRIVILEGES IN SCHEMA public GRANT ALL PRIVILEGES ON SEQUENCES TO relay;
ALTER DEFAULT PRIVILEGES IN SCHEMA public GRANT ALL PRIVILEGES ON FUNCTIONS TO relay;
GRANT USAGE, CREATE ON SCHEMA public TO relay;
Querying the database
Not very familiar with the commands to manage the postgres database, so here’s a cheat sheet.
1
2
3

sudo -i -u postgres
psql
\c buzzrelay
Redis Configuration
The instructions show an optional redis configuration and is included in the confg.yaml. I initially installed this, but after discussions with the author, it’s not used in this version of FediRelay.
This was used if you are going to host the page shown at https://fedi.buzz which doesn’t come with the open sourced relay code.
It’s really not necessary to install this then. Just comment out the associated lines in the YAML file and be done with it.
Here’s my notes on it because I lost a lot of time on this piece, so if for whatever reason you DO want this to work, leaving the notes here. Most of you should skip this!
Troubleshooting the redis install
Followed this gude for installing Redis on Ubuntu
I ran into an issue with using the suggested redis_password.txt file to store the password.
I used vim to create a file, then copied my password in from a random password generator I have locally. Whenever the app would attempt to use the file to authenticate, it didn't work.
I found two issues:
- If there were non-alpha numeric values in the password, something in the code was url escaping the value before submitting for authorization, making authentication fail. I removed all non-alpha numeric values and it worked.
- Even when I couldn't see them, some line breaks were causing issues with the authentication to fail as well. I had to run some special commands in vim to get rid of them.
So with a newline and special chars being url encoded, of course the password didn't match.
To get rid of newlines at the end of the file using vim:
:set noendofline binary
:w
Then be sure to remove all non alphanumerics from the password.
With those two issues resolved, redis is now working.
Update the config.yaml
Several items in this file need to be updated, see below.
Streams
- Leave the fedibuzz stream as is.
- Comment out the first example.
- Change the last example to your instance’s url and token.
- Add as many others as desired.
Additional filters for streams
If you have a token for an instance that you are using to connect to a mastodon public stream, you’re not limited to just the federated stream of all posts! If you want to get more granular, these streaming timelines work, too.
All of the items listed below have a /local/ version as well if you want to get REALLY granular and only pick up posts from the local instance.
This does not work for the default fedibuzz relay stream, only for mastodon servers for which you have an access token.
Public remote posts only - federated posts excluding local ones
You can also pass a “only_media” parameter in the querystring and get back only posts with some type of attachment (audio, image, or video) Cool!
1

GET /api/v1/streaming/public/remote?only_media={true|false}&access_token={yourAccessToken} HTTP/1.1
Public posts with a specific hashtag
This one does not has the only_media parameter unfortunately.
1

GET /api/v1/streaming/hashtag?tag={yourTag}&access_token={yourAccessToken} HTTP/1.1
Watch a list for posts Quite interesting here. For the user with the associated token, you can create a list of accounts and pass the list_id to this query. It will return only posts from those accounts.
Is this how setups like NewsMast and Flipboard are working behind the scenes?
1

GET /api/v1/streaming/list?list={yourListId}&access_token={yourAccessToken} HTTP/1.1
Hostname
Set it to your domain. I used the sub-domain format of “relay.{yourdomain}”
Private Key File
Generate a new RSA key pair for signing ActivityPub messages. Note using this command also sets the appropriate permissions values.
1
2

openssl genrsa -out private-key.pem 4096
openssl rsa -in private-key.pem -pubout -out public-key.pem
PostGres Password
Since I used the default user and dbname listed here, I just need to update the password.
Build it
From the root of the buzzrelay project, with the config.yaml finalized, run the following.
1

cargo build --release
This creates a compiled version in the target/release folder.
From the root of the project, you can run this command to start up the app:
1

cargo run --release config.yaml
This is where I ran into issues with redis, so be sure to comment out those lines in the config.yaml if you see that error here - it is NOT needed.
With the fedi relay public stream enabled, I see the following error stream quite often, showing that the uri is missing, which it is.
1
2
2024-03-23T03:39:34.773184Z TRACE buzzrelay::relay: data: {"created_at":"2024-03-23T03:39:33.020Z","url":"https://some.instance/notes/9r73vj18yk","content":"<p><a href=\"https://some.instance/@some.user\" class=\"u-url mention\">@some.user</a><span> Some Content</p>","account":{"username":"some.user","display_name":"some.display.name","url":"https://some.instance/@some.user","bot":true},"tags":[],"sensitive":false,"mentions":[],"language":"ja","media_attachments":[],"reblog":null}
2024-03-23T03:39:48.745870Z ERROR buzzrelay::relay: parse error: missing field `uri` at line 1 column 746
However, even with that error, content is coming in for at least the hashtag and instance relay types, so I move on.
Start using your relay
And with that, I had a running relay! Now you have to add it to your server. How?
Visit the url you setup for the hostname and hopefully you see this. Follow the instructions and copy the resulting URL.
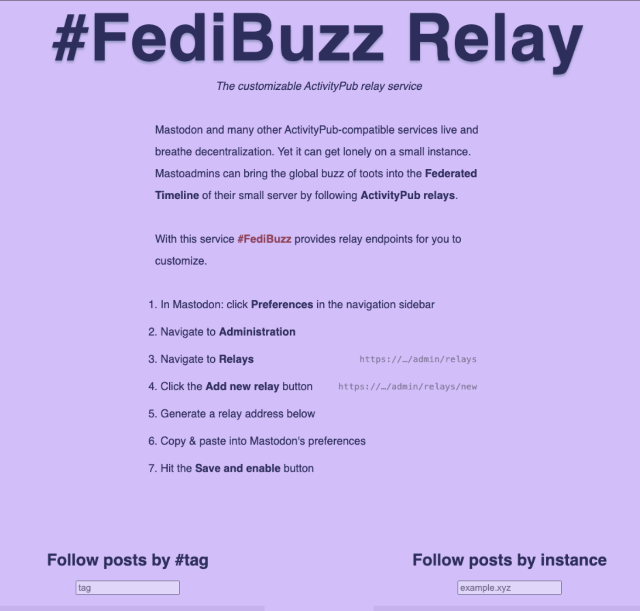
Normally, you have to be an administrator of a server to then register a relay to be used with a specific instance. I only have a Mastodon instance to play with, but this is found under Administration > Relays.
From your relay homepage (public), you can decide on the type of relay you want, and enter your content. Then copy the url into the Administration area. Refresh the page, and you should see that your relay has accepted the request.
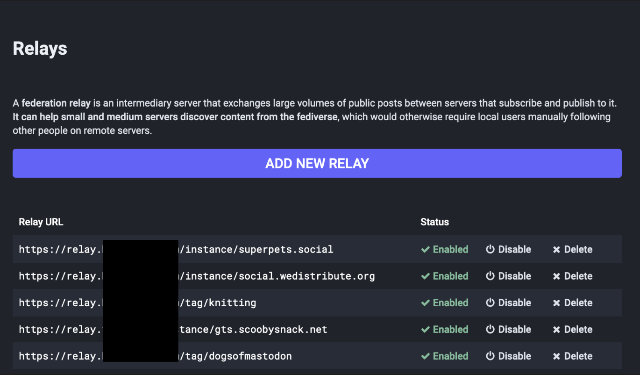
But you don’t have to be an admin! As an end user, you can also follow specific tags. Surprisingly, they do NOT have to already exist - you can just create it as an end user. It doesn’t seem to TRULY exist until someone follows it, tho.
So I can follow @tag-dogsofmastodon@relay.com from my single user GoToSocial instance, even tho my GtS server doesn’t have a concept of relays.
1
2

@instance-superpets.social@relay.com
@language-es@relay.com
If you follow this way, as an end-user, you’re going to see these in your feed as a “boost” from this account. Like “@language-es@relay.com has boosted this post”
You’re done! You can add a few more tags and instances if you want, but you should start seeing relay content streaming in to your instance now.
Congratulations!
Next steps
Check out the /metrics endpoint at {yourRelayDomain}/metrics for information about the current status of your relay.
Additionally, once you stabilize the settings, you may want to set this up to run automatically after a system reboot.
1

sudo nano /etc/systemd/system/buzzrelay.service
Edit the new service file, change the working directory to your own location.
[Unit]
Description=Buzzrelay Rust Application
After=network.target

[Service]
Type=simple
User=box464
WorkingDirectory=/home/box464/buzzrelay
ExecStart=/home/box464/.cargo/bin/cargo run --release /home/box464/buzzrelay/config.yaml
Restart=on-failure

[Install]
WantedBy=multi-user.target
Finally, enable the service, start it, and check the status.
1
2
3
4
5

sudo systemctl daemon-reload
sudo systemctl enable buzzrelay.service
sudo systemctl start buzzrelay.service
sudo systemctl status buzzrelay.service
Final Thoughts
This isn’t a long term install for me, I just wanted to see if it worked. I think the most surprising aspect was how few resources are needed for this to be stood up.
The incoming requests are streamed in, and never stored locally. As they come in, they are pushed into a queue for processing. If the server goes down for a while, there’s no queue to store them - those posts will just not be included in the relay.
And I think that’s fine for what a relay is attempting - a way to fill in content on a small instance.
Missing Uri in Posts
There are a lot of errors shown in the debug console for posts that don’t have a uri. I assume all those posts are being dropped.
I changed my local version to replace the missing Uri with the Url field if it’s missing. And it seems to work. At least, the error goes away.
Moderation
If I was using this long term, I would be a bit concerned about administrators and users being able to enter anything they want to follow, and there’s no real moderation happening.
I would probably disable the public facing homepage and have a submission request form instead.
I might even list all the relays that have already been setup for hashtags, instances and languages on the homepage instead so they can just choose those up front if they want, or submit a request for a new one.
Ideas to consider
Now that I have a working instance, I may work on a few tweaks. But don’t hold your breath.
I can see this being used kind of like a Bluesky Custom Feed.
- Allow the administrator of the relay to set all content from instances should only include posts with media, including the default fedibuzz relay. (this could cost users of the relay large amounts in CDN fees!)
- Allow the administrator of the relay to set excluded hashtags - similar to how only specific tags that are being followed, also set some hashtags that should be blocked from the stream. A good example - exclude posts with the NSFW tag or the NOBOT tag in a user’s profile, etc.
- Allow the administrator to setup a flag to exclude sensitive posts.
Comments
Total Interactions: 35Likes
Posts, Re-Posts and Bookmarks
Replies
@box464 Nice blog post, thank you very much!
Have you also experienced the situation of your Mastodon instance being endlessly stuck in "Waiting for relay's approval" mode for some public relays like https://relay.c.im/inbox?